
In the realm of home improvement and maintenance, mastery over seemingly small tasks can yield remarkable results. One such task is caulking trim, an activity that offers both aesthetic appeal and practical protection for various surfaces in a home. A well-executed caulking job not only enhances the visual appeal of your trim but also serves as a protective barrier against environmental damage. This article aims to provide a comprehensive guide on how to perfect this art, catering to every level of experience from beginners discovering their first DIY project to experienced homeowners looking to refine their skills further.
The subsequent sections will delve into the specifics of caulking trim – the materials required, preparation stages, application techniques, smoothing processes, cleanup measures and common pitfalls to avoid. The information provided strives for clarity and precision while maintaining an engaging narrative that appeals to the reader’s innate desire for proficiency. Understanding and applying these guidelines could transform an ordinary DIY task into a testament of skill and craftsmanship within your own home.
Materials Needed
Before embarking on the task of caulking trim, it is pivotal to gather necessary materials. Some of these essential items include a tube of caulk, a caulk gun, a putty knife, and a damp cloth for cleanup. The first three items serve as the primary tools for application while the latter aids in maintaining cleanliness throughout the process. Understandably, learning how to caulk baseboards can be seen as an intricate DIY trim improvement for home selling but with these tools at hand, one is on track toward achieving professional results.
Caulking trim is not merely an aesthetic enhancement; it also serves as an effective method to prevent dust accumulation and drafts in homes. Thus, mastering professional caulk techniques for home sellers becomes a valuable skill that contributes significantly towards improving their real estate property’s value. One must select high-quality silicone or acrylic latex paintable caulk which promises durability and flexibility over time. This choice will ensure that even under fluctuating temperatures and humidity levels typical in various domestic environments, your freshly applied caulk remains resilient against cracking or shrinking.
The selection of appropriate materials establishes the foundation for successful execution of this task—caulk application for real estate staging—that can aesthetically transform space and upgrade your trim before listing your home. It is crucial to remember that patience pays off during application; hasty work may result in uneven lines or smudges that detract from the overall appeal you aim to achieve with this undertaking. As we transition into discussing preparation methods prior to commencing work on this project, bear in mind that careful planning paired with meticulous execution will yield optimal results.
Preparation Steps
Ensuring that the area is clean, dry and free of old adhesive or paint is an essential step in the preparation process. Furthermore, this initial maintenance can contribute significantly to diy home upgrades for a quick sale. With attention to detail and proper planning, it is possible to ensure that the trim remains in excellent condition. A critical aspect of trim maintenance for a speedy home transaction involves preparing it correctly before caulking, ensuring that it looks presentable and attractive to potential buyers.
- Remove any existing caulk: One of the first steps in preparation involves removing any old caulk from the trim. This may require a scraper or putty knife.
- Cleanse thoroughly: Afterward, cleanse the area with soapy water or a specialized cleaner to remove dust and grime.
- Dry completely: Ensure that all moisture has been eliminated from the surface before proceeding with caulking.
- Tape off the areas around the trim: To achieve precise lines when applying new caulk, tape off areas adjacent to where you plan on caulking.
Such meticulousness contributes not only towards enhancing aesthetic appeal but also serves as one of many ingenious caulking hacks for a faster home sale; bearing testament to the importance of trim in home selling ventures.
Without using phrases such as ‘in conclusion’ or ‘finally’, it must be emphasized how these preliminary actions lay down solid groundwork for what comes next – applying fresh caulk onto your carefully prepared surfaces. The significance lies within understanding how much impact these preparation steps have on achieving professional-grade results which inevitably raise property value even further; making this process an integral part of diy home upgrades worth mastering before moving onto application procedures immediately following these necessary preparations in How To Caulk Trim.
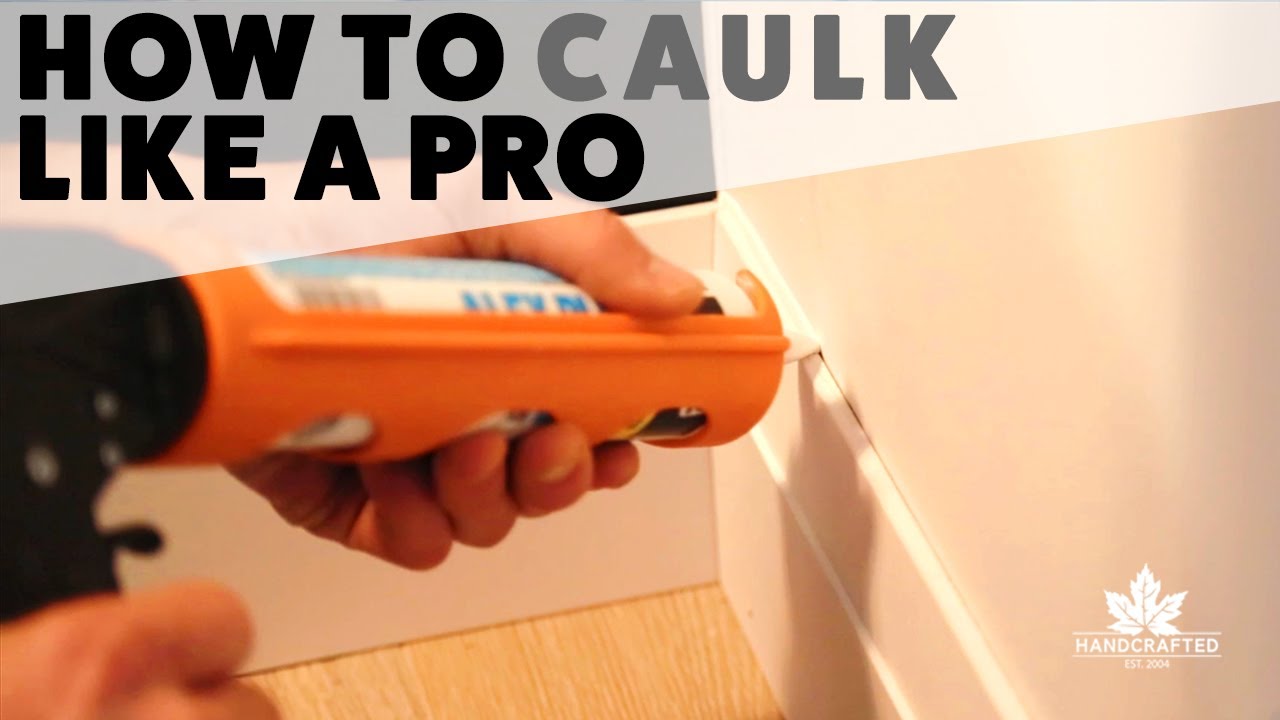
Applying the Caulk

Moving onto the phase of application, it is critical to remember that a steady hand and patience are key factors in achieving an immaculate finish. Properly applied caulk not only enhances the aesthetic appeal of trim but also contributes significantly towards improving home aesthetics with caulk. A few caulking tips for selling a house involve ensuring that all gaps and holes are sealed properly to present a tidy appearance. Moreover, it is essential to work at a measured pace, continuously maintaining pressure on the gun’s trigger for even distribution of caulk.
The right technique can make all the difference when attempting to maximize resale value with trim caulking. To achieve topnotch trim for a speedy home sale, start by holding the caulk gun at a 45-degree angle against the area being sealed, then gently squeeze the trigger while steadily dragging along the length of the seam or joint. This technique ensures an even application which will result in a polished look, making your home more attractive to potential buyers.
To continue this process successfully without creating mess or wasting material, release the trigger before pulling away from each finished section – one of many practical caulking tricks to sell your house faster. By following these guidelines during application and subsequent stages, homeowners can drastically enhance their property’s overall appeal and increase chances for expedient sale at desired prices. The next segment will provide further insight into how this accomplished appearance can be maintained through an effective smoothing process after application.
Smoothing Process
An integral step that follows the application phase is the smoothing process, which plays a pivotal role in creating a seamless and polished finish. The smoothing process not only enhances the aesthetic appeal but also ensures proper sealing of gaps, contributing to the overall durability of the trim work. This procedure can be seen as a quick home improvement for selling due to its ability to refine and elevate the look of any room, thereby boosting home value with trim caulking.
| Smoothing Tools | Technique | Result |
|---|---|---|
| Wet Finger | Simply run your finger along with the caulk bead while applying even pressure. It helps in achieving a smooth finish and removing excess caulk. | Produces a uniform and clean line; however, it may leave residue on fingers. |
| Caulk Smoothing Tool (also known as a caulk finishing tool) | Glide this tool across the applied bead with consistent pressure for an even layer. | Provides professional-grade precision & neatness without messiness or waste. |
| Damp Sponge or Cloth* | Wipe down gently over freshly applied caulking to remove surplus material. | Offers fine control over how much product remains after smoothing; however, needs frequent rinsing during use.* |
Selling tips for a well-maintained home often include highlighting small details such as neatly caulked trims – evidence of meticulous care taken by homeowners. Thus, mastering this technique could potentially sell your house faster with trim upgrades being observed by potential buyers who appreciate minute attention to detail – think ‘home staging secrets: trim caulking edition’. While this task requires some patience and practice initially, perfecting it can result in profound satisfaction from witnessing an immediate transformation in one’s living space.
The subsequent steps involve ensuring that all tools used are thoroughly cleaned post-application and implementing maintenance practices that promote longevity of your hard work. Keeping these considerations at forefront will guarantee that the recently upgraded trims remain in excellent condition for a foreseeable future, reflecting well on the overall upkeep of the house.
Cleanup and Maintenance
Proper cleanup of tools and regular maintenance practices play an essential role in preserving the pristine condition and longevity of your recently enhanced home features. When the trim has been sealed with caulk, it is essential to ensure that no residual material remains on the application tools or surrounding surfaces. This not only maintains the aesthetics but also prolongs the life of these tools, ensuring that they’re ready for use in future projects.
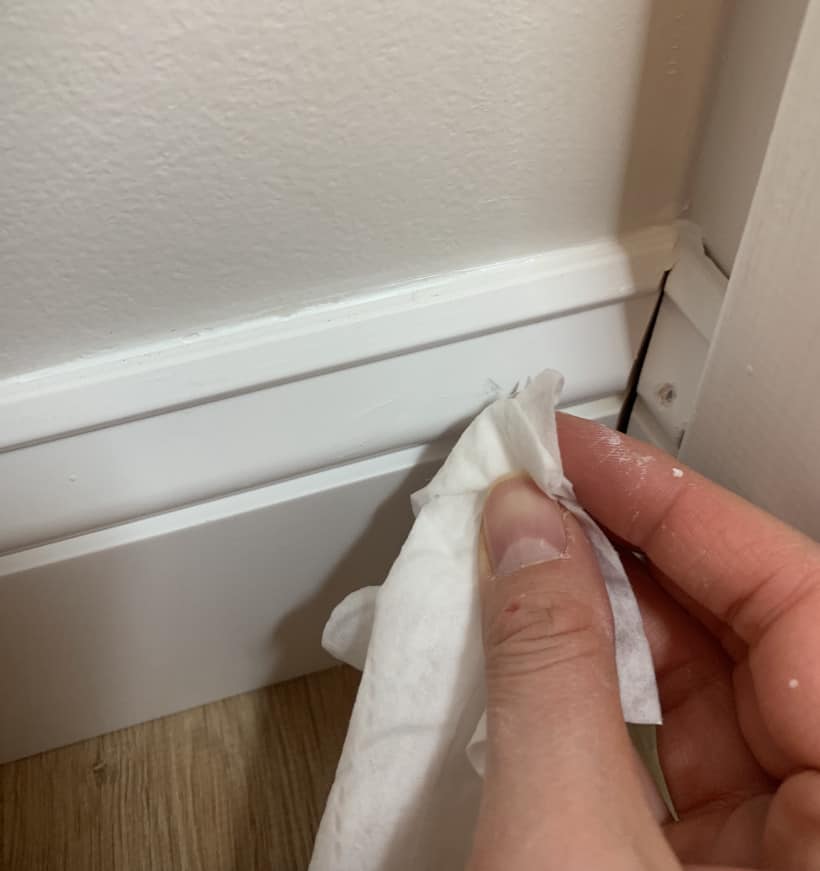
- Immediately after use, clean all caulking guns and spatulas with a cloth soaked in mild detergent or soapy water.
- If there’s any dried caulk on your tools, gently scrape it off using a plastic scraper to avoid damaging them.
- Make sure you store all your materials and equipment properly in a cool dry place after every use.
These simple yet effective habits can enhance curb appeal with caulk by maintaining its fresh appearance over time. Moreover, regular inspections should be conducted to assess any potential damage or weathering effects on the caulked surfaces. These inspections are crucial as they allow for timely interventions which prevent minor issues from escalating into more significant problems that could compromise not just visual appeal but structural integrity too.
The practice of proper cleanup and regular maintenance goes beyond merely keeping one’s work area tidy; it is an integral aspect of successful home improvement tasks such as caulking trim. Remember this: A well-maintained tool set is a testament to craftsmanship, reflecting attention to detail and respect for one’s trade. Now let us delve deeper into some common mishaps associated when caulking trim – understanding these will help avoid them thus paving way towards mastery over this skill.
Common Mistakes
In the realm of home improvement, understanding and steering clear of common pitfalls associated with sealing edges and corners can significantly elevate the quality of your workmanship. One prevalent error is applying an excessive amount of caulk, which leads to a messy appearance that detracts from the aesthetic appeal of the trim. Furthermore, this overuse often results in longer drying times and may even compromise the effectiveness of the seal. Another frequent mistake is neglecting to prepare surfaces adequately before caulking; any residual dust or moisture can hinder adhesion and diminish longevity.
Mastery in caulking trim requires patience as rushing through this task tends to generate undesirable outcomes. A common misstep made by novices involves skipping tooling after application. Tooling—or smoothing out—the caulk ensures it properly fills gaps and creates a clean finish line between wall and trim. Leaving un-tooled caulk allows it to dry unevenly, generating unsightly bulges that may peel off over time. Additionally, many individuals mistakenly assume all types of caulk are interchangeable; in reality, using an inappropriate product for your specific project can result in premature failing or discoloration.
Avoidance of these mistakes plays an essential role in achieving professional-quality results when caulking trim. However, even flawless execution cannot compensate for poor design choices or subpar materials selection at the outset. The subsequent section will discuss how selecting suitable finishes not only enhances visual appeal but also extends lifespan—providing both practicality and elegance for years to come.
Finishing Touches
Selecting the right finish not only serves to elevate the aesthetic appeal of a room, but also significantly extends the durability and longevity of the sealant application, thereby ensuring seamless edges and corners that stand the test of time. After applying caulk to trim, it is essential to choose an appropriate finishing tool or technique to smooth out the bead and ensure its flawless integration with surrounding surfaces. The choice of tool may range from a simple finger method (using a moistened finger), through specialized caulking tools made from various materials such as rubber, plastic, or metal.

For those seeking mastery in this area, understanding how different tools impact the finish can be insightful. For instance, using one’s finger might result in a less polished look compared to using professional-grade tools. However, beginners might find this method more manageable before moving on to more complex tools. Additionally, temperature and humidity conditions at work should be considered when choosing a finishing approach as these factors can significantly affect how fast or slow caulk dries.
An often overlooked aspect of achieving a perfect finish lies in allowing ample curing time for the sealant before exposing it to moisture; premature exposure may lead to compromised durability and appearance. Therefore, patience is crucial when carrying out this process; rushing through could mean sacrificing quality for speed – a trade-off that rarely pays off in terms of long-term satisfaction with results achieved. It is equally important to keep an eye on detail while smoothing out any imperfections during drying process: keen observation combined with meticulous action will yield results that are both durable and visually appealing.
Frequently Asked Questions
What are the safety precautions to take while caulking trim?””
Safety precautions during caulking trim include wearing protective gear such as gloves and goggles, ensuring adequate ventilation to prevent inhalation of fumes, and taking care not to damage surfaces with the caulking gun.
How long does it usually take for the caulk to dry completely?””
The duration required for caulk to dry completely can vary, typically ranging from 24 to 48 hours. Factors such as temperature, humidity, and the type of caulk used can influence the drying time.
Are there any specific types of caulk that are best for caulking trim?””
Indeed, when selecting caulk for trim, one should consider acrylic latex or siliconized acrylic caulk. These types provide adequate adhesion, flexibility and are paintable, making them suitable options for caulking trim.
Is it necessary to hire a professional for caulking trim or can it be a DIY project?””
Caulking trim, although requiring precision and attention to detail, can be accomplished as a DIY project. Professional help is not obligatory; with the right tools and careful execution, satisfactory results can be achieved independently.
What are the alternatives to caulking for sealing gaps in trim?””
Alternatives to caulking for sealing gaps in trim include using wood filler, expanding foam, or weatherstripping. These methods can provide effective solutions depending on the size and location of the gap needing treatment.
Other Articles You Might Enjoy
How To Change A Deed When You Inherit Property